In Google Docs, you can easily enhance your documents with professional elements like a table of contents, a watermark, charts, and citations. We show you how.

Once you’ve mastered the basics of Google Docs, it’s time take your documents up a notch. Some documents need to include citations, while some can benefit from charts or a table of contents. Others may require a watermark for security or branding purposes. In this guide, we’ll show you how to work with these four elements in Google Docs for more professional documents.
How to add charts in Google Docs
When your document contains lots of facts and figures, charts can highlight and clarify the most important data points. There are two ways to add a chart to a document in Google Docs: you can create a new chart or embed an existing chart from a spreadsheet in Google Sheets.
Add a new chart
Click to place the cursor in your document where you want the chart to go. From the menu bar over your document, click Insert > Chart and select Bar, Column, Line, or Pie.
A chart with placeholder data appears in your document. At the same time, a new Google Sheets spreadsheet is added to your Google Drive. This spreadsheet contains the data for the chart and is linked to the chart in your document.
Click on the chart in your document to select it. A frame with eight dots appears around the chart. On the upper right of this frame, click the chain icon and select Open source from the menu that opens.
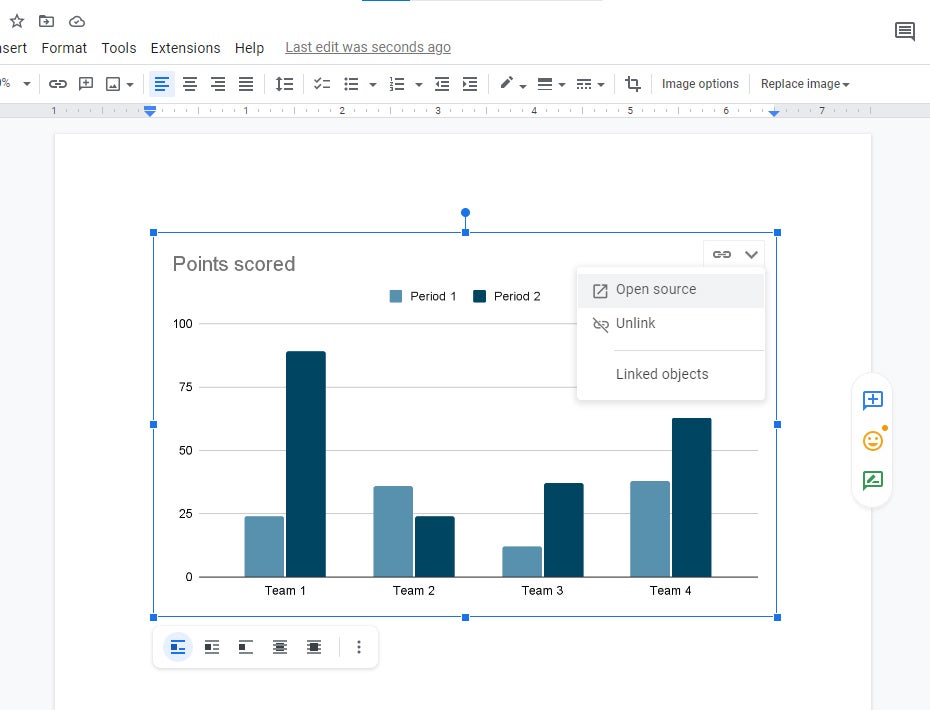 Howard Wen / IDG
Click Open source to open the linked spreadsheet in Google Sheets. (Click image to enlarge it.)
Google Sheets opens the source spreadsheet for this chart in a new browser tab. In Google Sheets, you can change the values for the chart, such as its labels and numbers, by editing the cells that contain these values.
The chart also appears on this spreadsheet. You can modify its look and style by clicking to select it, clicking the three-dot icon that appears at its upper right, and selecting Edit chart from the menu that opens. This will open the “Chart editor” sidebar to the right. Here you can make edits to the chart such as changing it to a different chart type or customizing its colors. (For details on how to use the Chart editor in Sheets, refer to Google’s guide.)
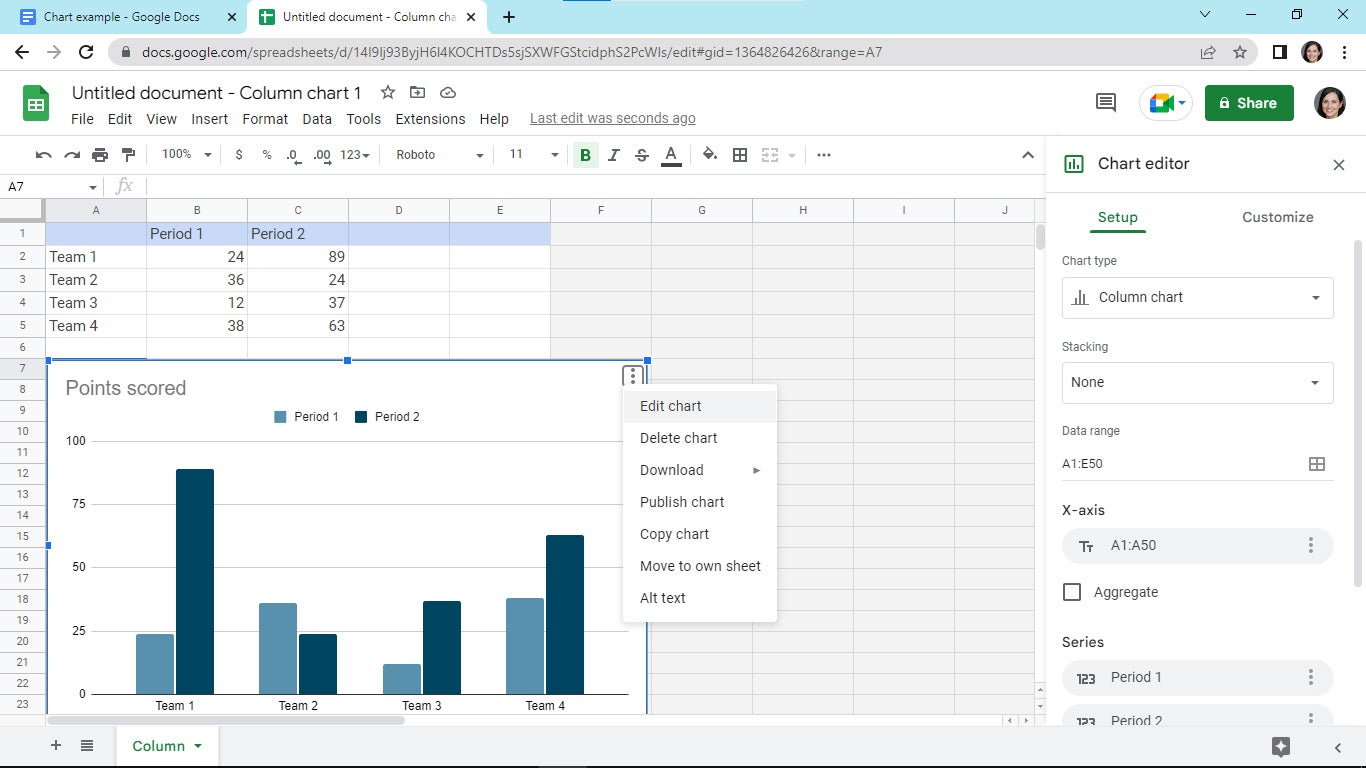 Howard Wen / IDG
You can edit the chart’s values, style, and other elements in Google Sheets. (Click image to enlarge it.)
The changes you make to the chart in Google Sheets, either by changing the cells’ values or by using the Chart editor, don’t show up on the linked chart in Google Docs right away. To update the chart in your document, click to select it, then click the UPDATE button at its upper right.
Embed an existing chart
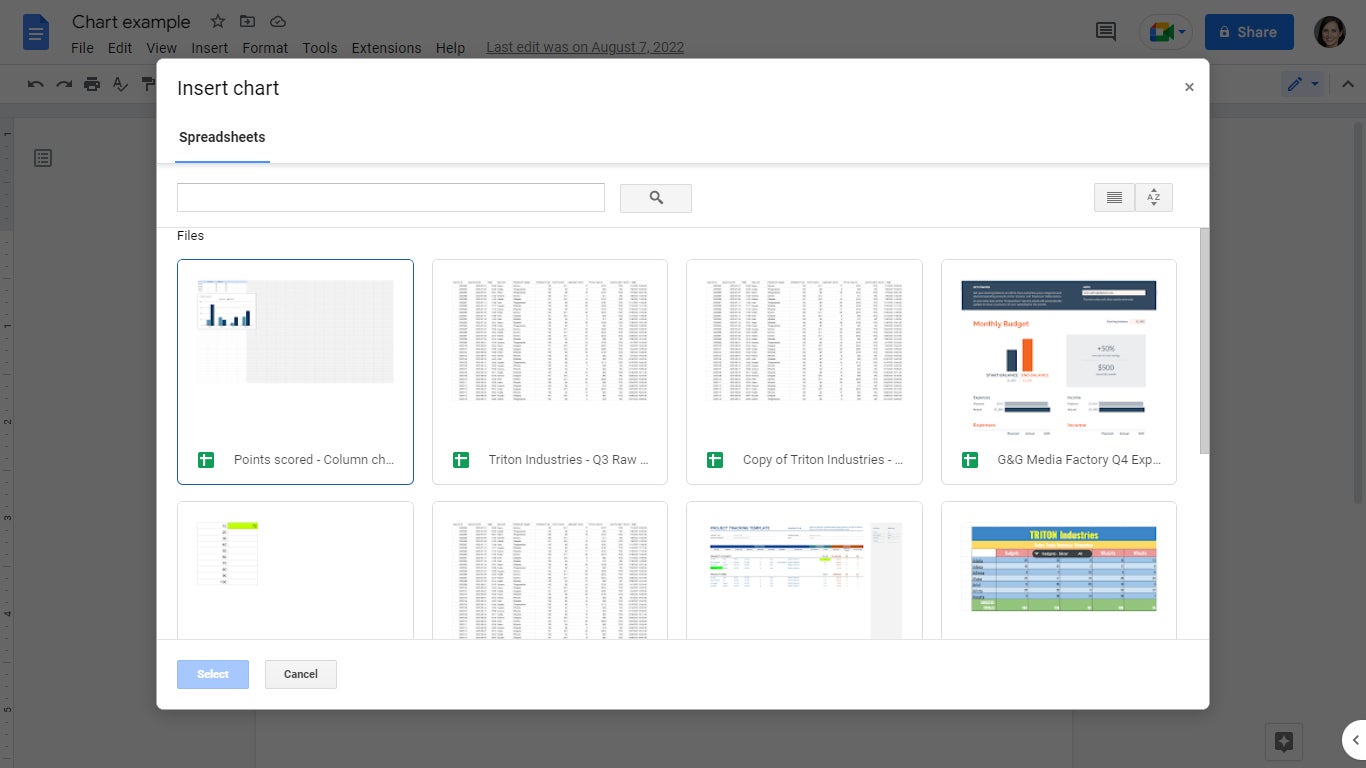
If you already have a Google Sheet with a chart you want to use in your document, the process is similar. Place the cursor in your document where you want the chart to go. From the menu bar over your document, click Insert > Chart > From Sheets. On the panel that appears, double-click the spreadsheet that contains the chart you want to insert.
 Howard Wen / IDG
Choose the spreadsheet that contains the chart you want to embed. (Click image to enlarge it.)
On the following panel, select the chart you want to insert and click the Import button. The chart will appear in your document.
To edit the chart at any point, click to select it, click the chain icon at upper right, and select Open source from the menu that opens. You can change the chart’s style or data values or in Google Sheets as described above, then click the UPDATE button on the chart in Google Docs to have those changes appear in the document.
Resize or move the chart
Resize the chart: Click to select the chart in your document. A frame with eight dots will appear around the chart. Click-and-hold one of these dots and drag it to resize the chart.
Move the chart: By using this frame, you can also drag-and-drop the chart to another area on a page. Move the pointer over the chart until the pointer changes to a crosshair. Click-and-hold, and then drag the chart to where you want it to be set on the page.
How to add citations in Google Docs
One of the most difficult things to do when you’re writing a formal paper — for academic or research purposes, in particular — is putting together a list of citations for it. This process requires you to get the formatting correct for each citation, which is very exacting and mundane. Fortunately, Google Docs has an excellent tool that walks you through inserting citations into your document. It can help you quickly build a bibliography or references list.
Create a citation and build a citations list
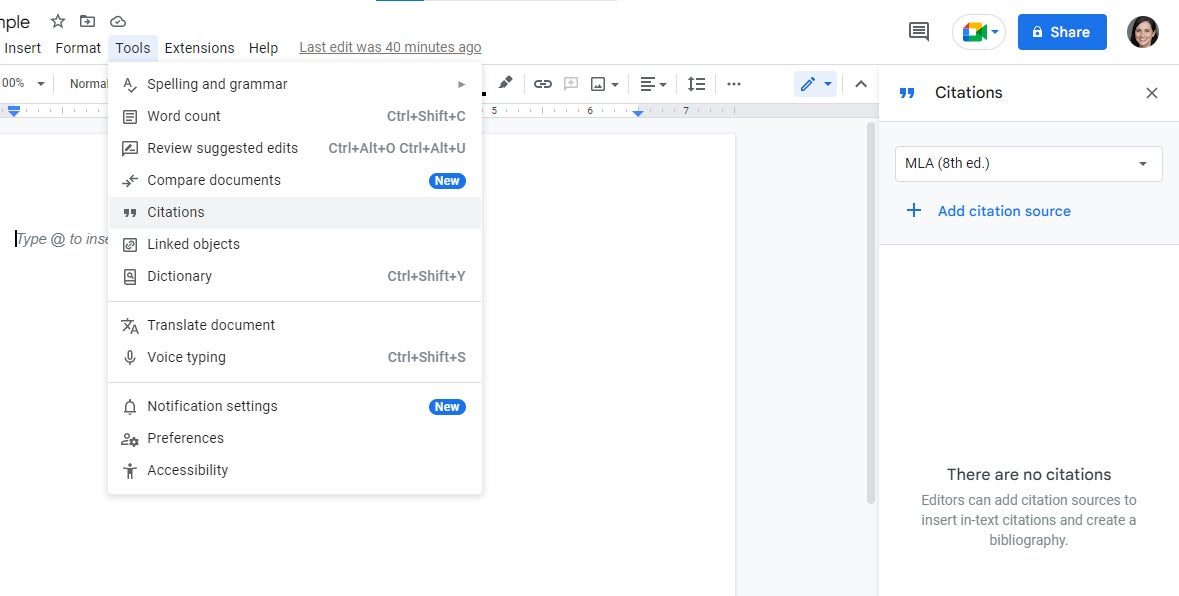
From the menu bar over your document, click Tools > Citations. This will open the Citations sidebar along the right.
First, decide which citation format you want. MLA is listed by default in the dropdown, or you can click the dropdown and select APA or Chicago Author-Date format.
 Howard Wen / IDG
Open the Citations sidebar to begin creating a citations list. (Click image to enlarge it.)
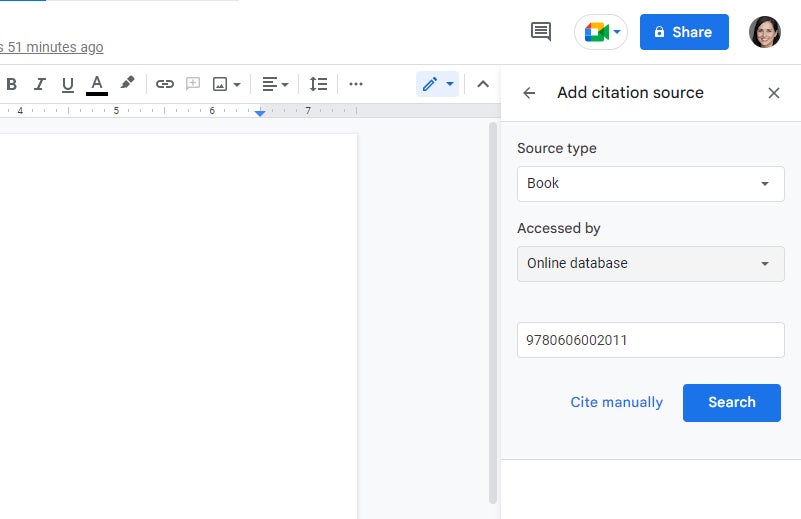
After you select the citation format, click + Add citation source. The sidebar switches to a new panel called “Add citation source.” Click the Source type dropdown and select the source type for your citation, such as Book, Journal article, Newspaper article, or Website.
Next, click the Accessed by dropdown. The options that appear on this dropdown’s menu depend on the source type you selected. For example, if you select Book as your source, then the “Accessed by” dropdown menu lists Print, Website, and Online database. If you select any of these three, an entry box opens below, where you can enter the book’s ISBN.
 Howard Wen / IDG
Searching for a citation source. (Click image to enlarge it.)
Click the Search button, and the Citations sidebar looks up information for the book (such as author, title, and publisher), using the search source you selected under the “Accessed by” dropdown. The information for the book appears in the sidebar.
Click the Continue button. The sidebar switches to another panel with additional fields (such as city, edition, and volume) that you can fill in if they’re needed. When you’re finished reviewing and modifying these details, click the Add citation source button at the bottom of the panel.
 Howard Wen / IDG
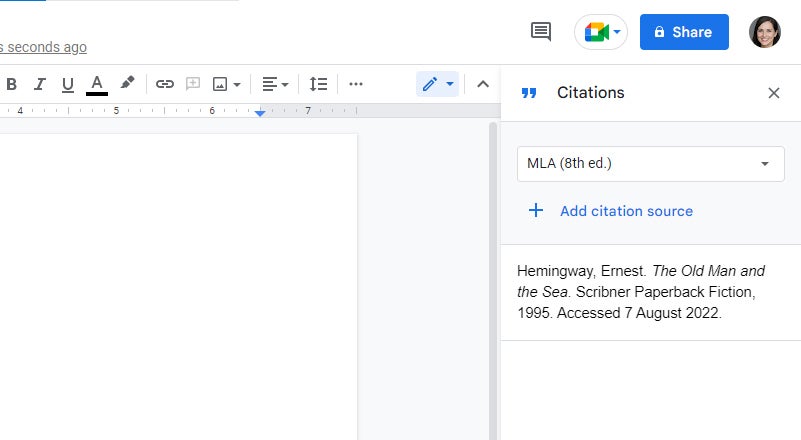
Your citation sources appear in a list in the Citations sidebar. (Click image to enlarge it.)
The citation will be saved to a list on the Citations sidebar. You can create more citations to add to this list by repeating the steps above, with some variations depending on the “Source type” and “Accessed by” options you choose. For example, if you choose “Newspaper article” and “Website,” you’ll be asked to enter the URL for the article you want to cite. With certain types of sources, such as journal articles, you’ll need to enter details such as author, title, and publication manually.
Through this process, you can build an extensive citations list, organized in alphabetical order by author’s last name.
Add the citations list to your document
Place the cursor in your document where you want to insert your citations list. (Typically, you list citations toward the end of your document.) If it’s not already open, open the Citations sidebar by clicking Tools > Citations from the menu bar over your document.
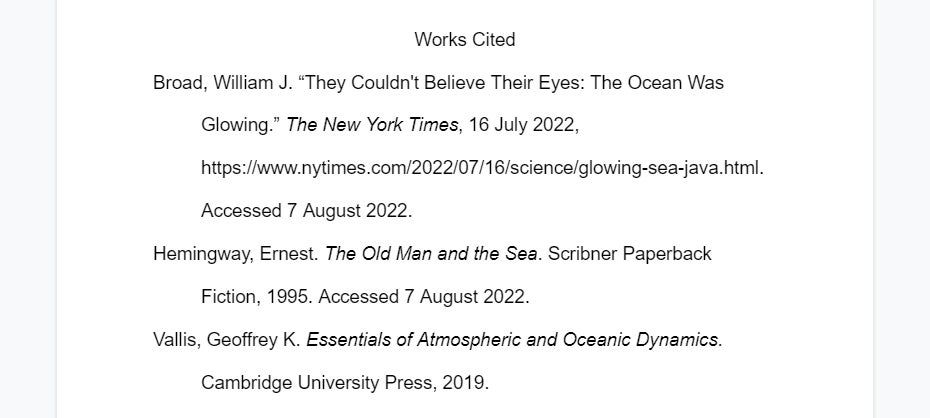
On the Citations sidebar, click the Insert Works Cited (or Insert References) button at the bottom of the pane. Your full list of citations appears in the document.
 Howard Wen / IDG
A citations list in a document. (Click image to enlarge it.)
Add an in-text citation
Within your document, you can add an abbreviated version of a citation that’s listed at the end of your document.
Click to place the cursor in your document where you want the in-text citation to go. On the Citations sidebar, move the pointer over the citation. Click the word Cite when it appears over the citation.
The abbreviated citation is inserted. With some sources, such as books or journal articles, a “#” placeholder appears in the citation. Replace the “#” with the page number your citation comes from.
 Howard Wen / IDG
Inserting an in-text citation. (Click image to enlarge it.)
Edit or delete citations
To change or delete the citations that you’ve created for your document, open the Citations sidebar and move the pointer over the citation. Click the three-dot icon when it appears over the citation. From the menu that opens, you can select Edit or Delete.
Selecting Edit will switch the sidebar to a panel where you can edit the various attributes of the source for the citation. When you are finished with your changes, click Save source at the bottom of the pane.
Note that if you change a citation after you’ve added it as an in-text citation or inserted the citations list in your document, it won’t be updated in the document. In those cases, it’s best to remove the in-text citation or citations list from the document and then insert the updated version.
How to add a table of contents in Google Docs
Google Docs can automatically create a table of contents (TOC) for your document. It provides readers with an overview of what’s in the document and lets them jump directly to sections that interest them. Business proposals, research documents, and most kinds of financial reports can benefit from having a TOC for readers to use.
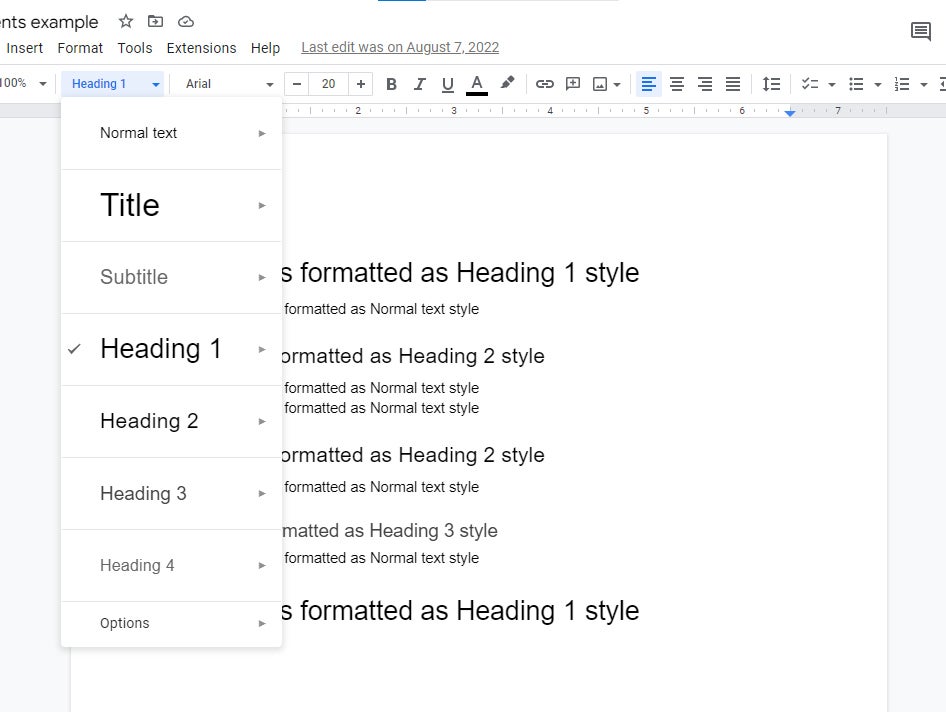
To use this feature correctly, you first need to format your document with different heading levels. To do so, select the line of text you want to be a heading and click the Normal text dropdown in the toolbar above your document. From the menu that appears, select Heading 1, Heading 2, or Heading 3, and your text is formatted accordingly.
 Howard Wen / IDG
Choosing a heading format. (Click image to enlarge it.)
When you create a table of contents, Google Docs formats it according to these heading levels:
- Every line of text in your document that you’ve formatted in Heading 1 style is set as a main section in the TOC generated by Google Docs.
- Every line of text in your document that you’ve formatted in Heading 2 style is indented to the right.
- Every line of text in your document that you’ve formatted in Heading 3 style is indented to the right twice.
- A line of text that is formatted as normal text does not appear in the table of contents.
Add a table of contents
Click to place the cursor in your document where you want the table of contents to go. (Typically, the table of contents goes at the beginning of your document.)
From the toolbar over your document, click Insert > Table of contents. A small panel pops up from the menu.
 Howard Wen / IDG
Choose between Plain Text and Links style for your TOC. (Click image to enlarge it.)
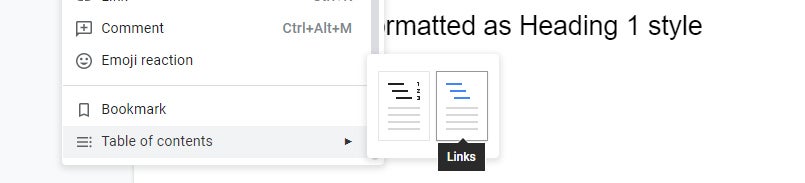
In this panel you can choose between two TOC styles:
- Plain Text: Each heading in the table of contents includes the page number where the heading is located. Although it all looks like plain text, you can click any heading in the TOC, then click the link that appears below to jump to that heading in your document.
- Links: There are no page numbers, and the headings are in blue underlined text. You can click any heading, then click the link that appears below to jump to that heading in your document.
 Howard Wen / IDG
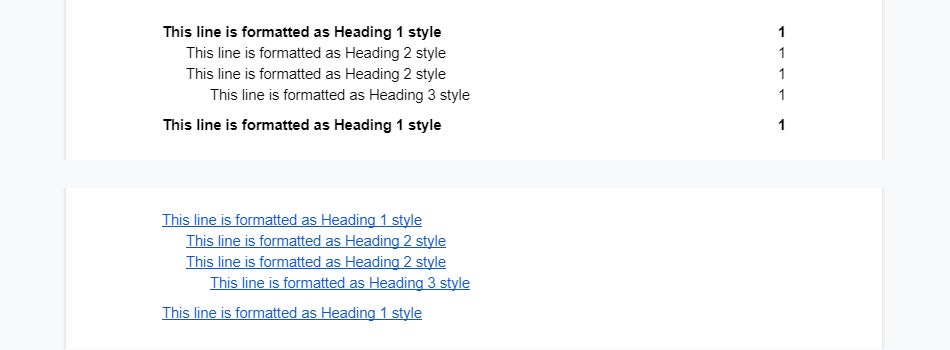
A Plain Text TOC on top, a Links TOC below. (Click image to enlarge it.)
Edit your table of contents
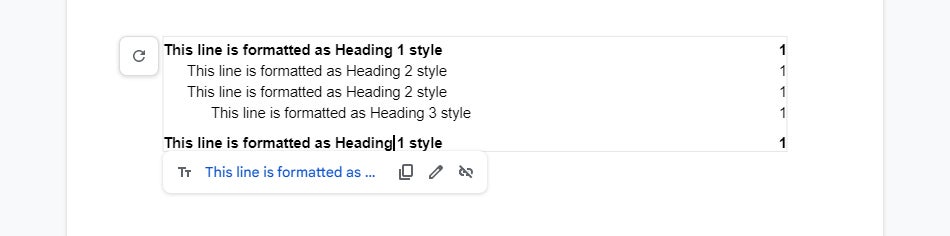
Click to place the cursor in the midst of a heading in the table of contents. A gray frame appears around the table of contents, and a small panel opens below the heading that includes a blue link to the heading in your document. The three icons on the right of this panel let you copy this link, edit the link, or unlink the heading. If you unlink it, the heading remains in the TOC, but clicking it does nothing.
 Howard Wen / IDG
The toolbar for a linked heading in a TOC. (Click image to enlarge it.)
You can change the formatting of any of the text in the TOC as you normally do with other text throughout the rest of your document. This includes the text color, font, size, and style, among other things.
Important: If you make changes to the headings in your document after you add your TOC, those changes won’t be reflected in the TOC unless you update it. So whenever you make changes to headings in your document, go back to the TOC, click anywhere in it, and then click the circular arrow icon at the upper left. The headings in your TOC will be updated to match the changes you made.
Delete a table of contents
Right-click anywhere over the table of contents. On the menu that opens, scroll down and click Delete table of contents.
Next page: How to add a text or image watermark →
How to add a watermark in Google Docs
A watermark is a subtle visual element you can add to a document, typically to establish ownership, authenticity, or branding. Watermarks can also be used to signify a document’s status, such as “draft” or “confidential.”
Google Docs lets you watermark documents with text or an image (such as a company logo) faded into the background of every page. A document can have either an image watermark or a text watermark, not both.
Add an image as a watermark
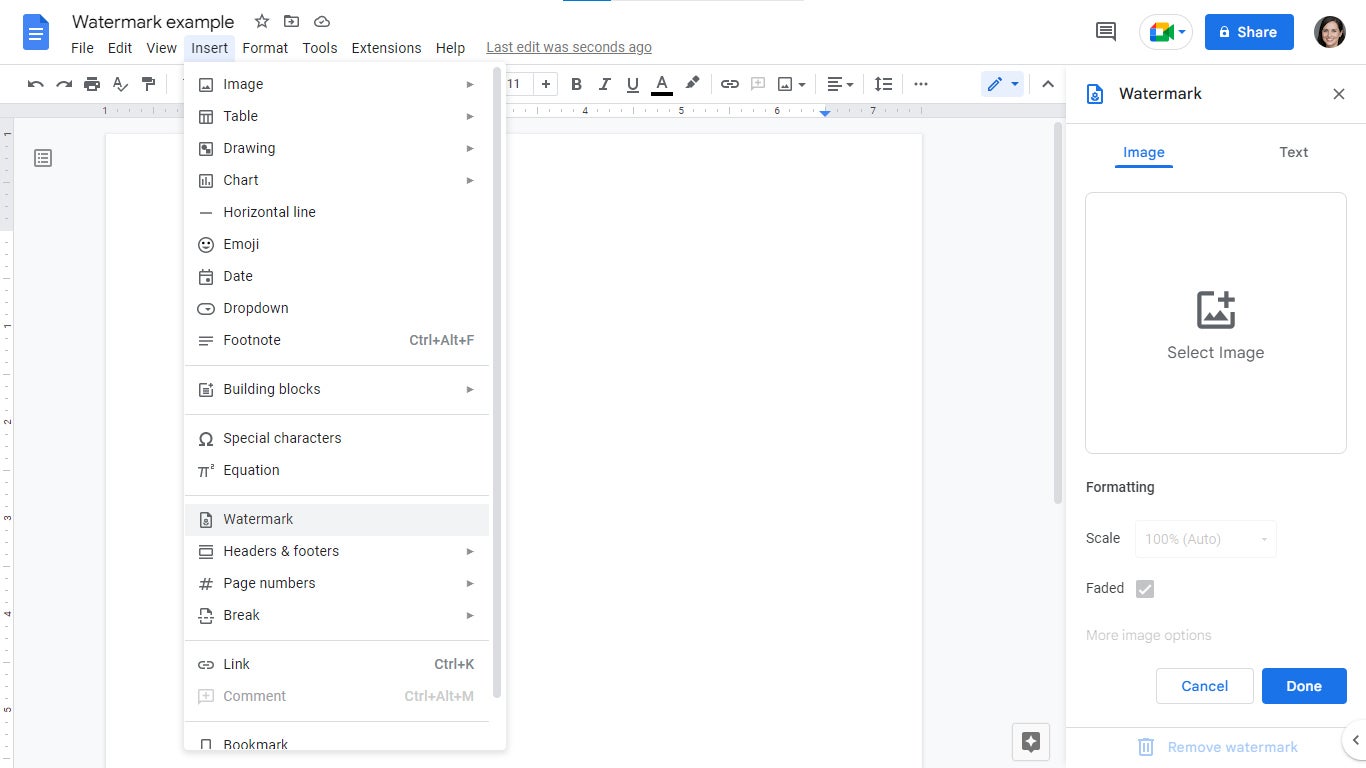
From the menu bar over your document, click Insert > Watermark. This will open the Watermark sidebar along the right.
 Howard Wen / IDG
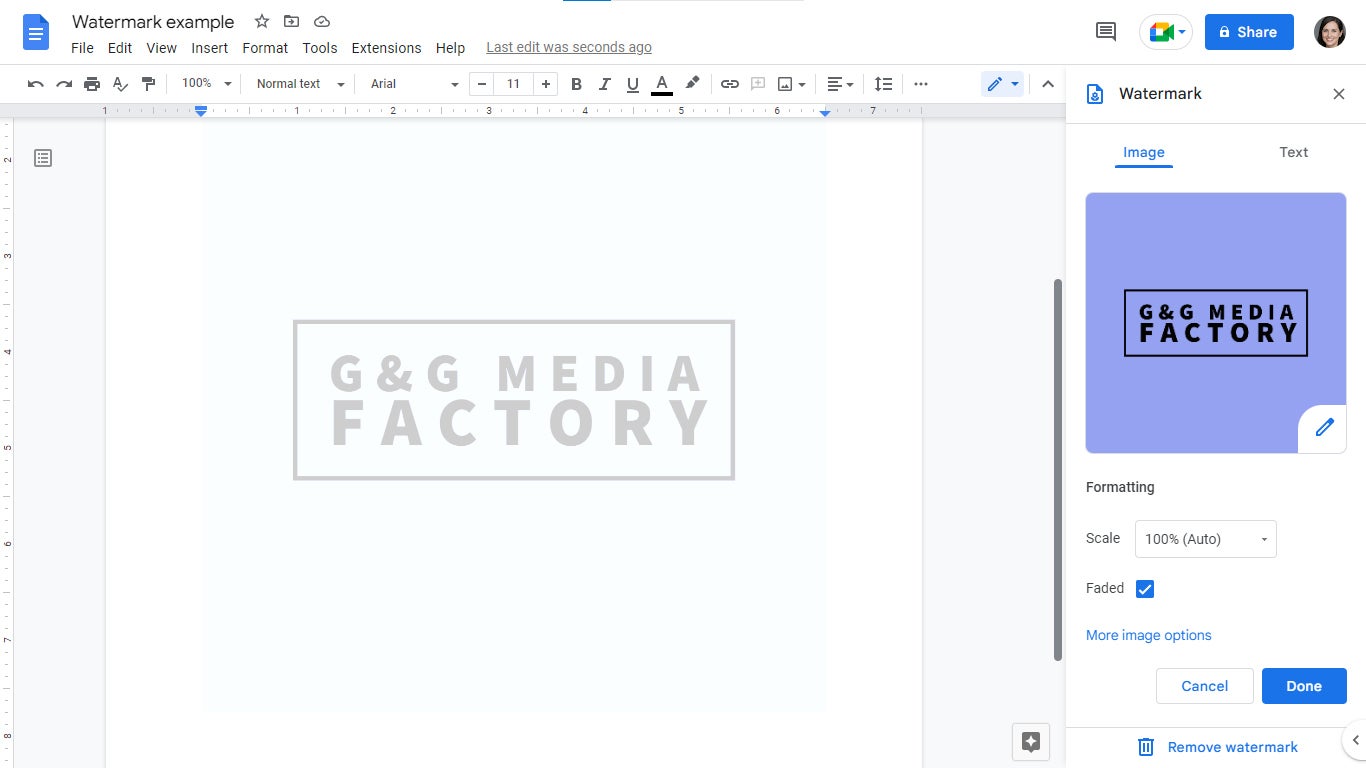
Select Insert > Watermark to open the Watermark sidebar. (Click image to enlarge it.)
Click Select Image. Using the large panel that opens over your document, select an image from one of several sources: you can use an image that’s saved on your PC’s drive, in your Google Photos account, or on your Google Drive; take a new picture with your PC’s webcam; paste in the URL for an image on the internet; or search for an image on Google.
Once you’ve selected an image, it’s immediately added to the background of every page of your document.
Adjust an image watermark
On the Watermark sidebar, you can change the watermark’s size by clicking the dropdown menu to the right of “Scale.” You can turn off the faded appearance of the watermark by unchecking the box by “Faded.”
 Howard Wen / IDG
You can adjust the size and other formatting for an image watermark. (Click image to enlarge it.)
Clicking More image options changes the sidebar to “Image options,” where you can tweak the watermark with more precision and adjust other aspects of it: You can change its size by inches or percentage, rotate it, reposition it on your pages, and recolor it. Finally, you can adjust the intensity of its transparent effect, brightness, and contrast. When you’re done with this panel, click the X in the upper right corner to return to the main Watermark sidebar.
When you are finished adding an image and adjusting it the way you want, click the Done button at the bottom of the sidebar.
Resize or move an image watermark
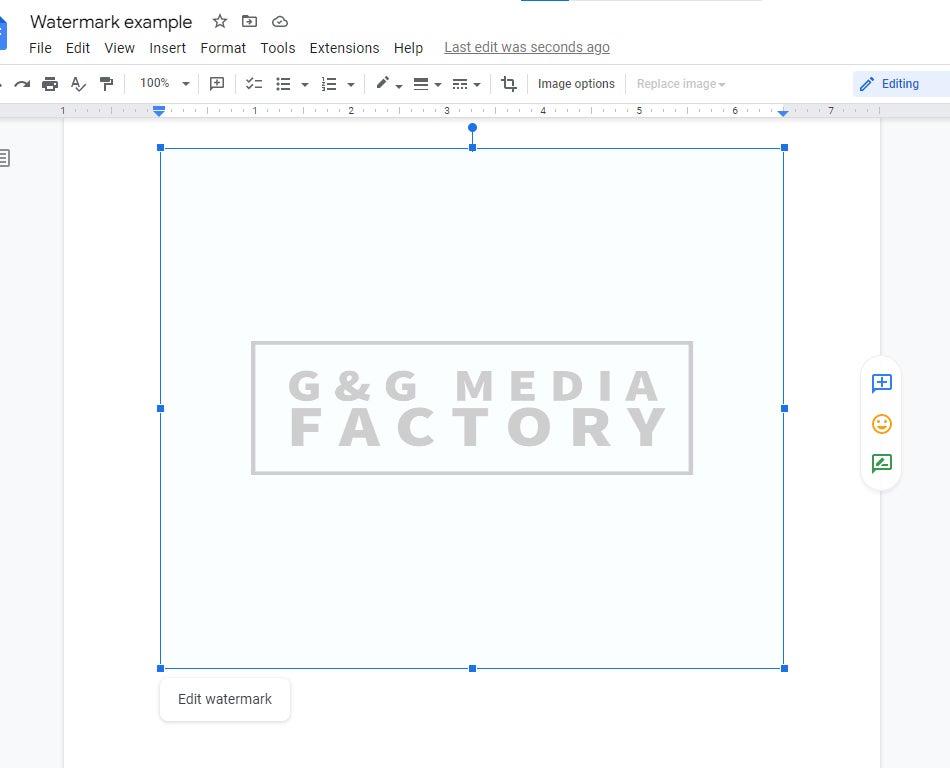
You can also resize the watermark image by double-clicking it on a page in your document to select it. When it’s selected, a frame with eight dots will surround it. Click-and-hold one of these dots and drag it to resize the watermark.
 Howard Wen / IDG
Double-click the image watermark, then use its frame to resize or move it. (Click image to enlarge it.)
By using this frame, you can also drag-and-drop the watermark image to another area on the page: Move the pointer over the image until the pointer changes to a crosshair. Click-and-hold, and then drag the image to where you want it to be set on the page.
Moving or resizing the watermark on one page also changes it on the other pages throughout your document.
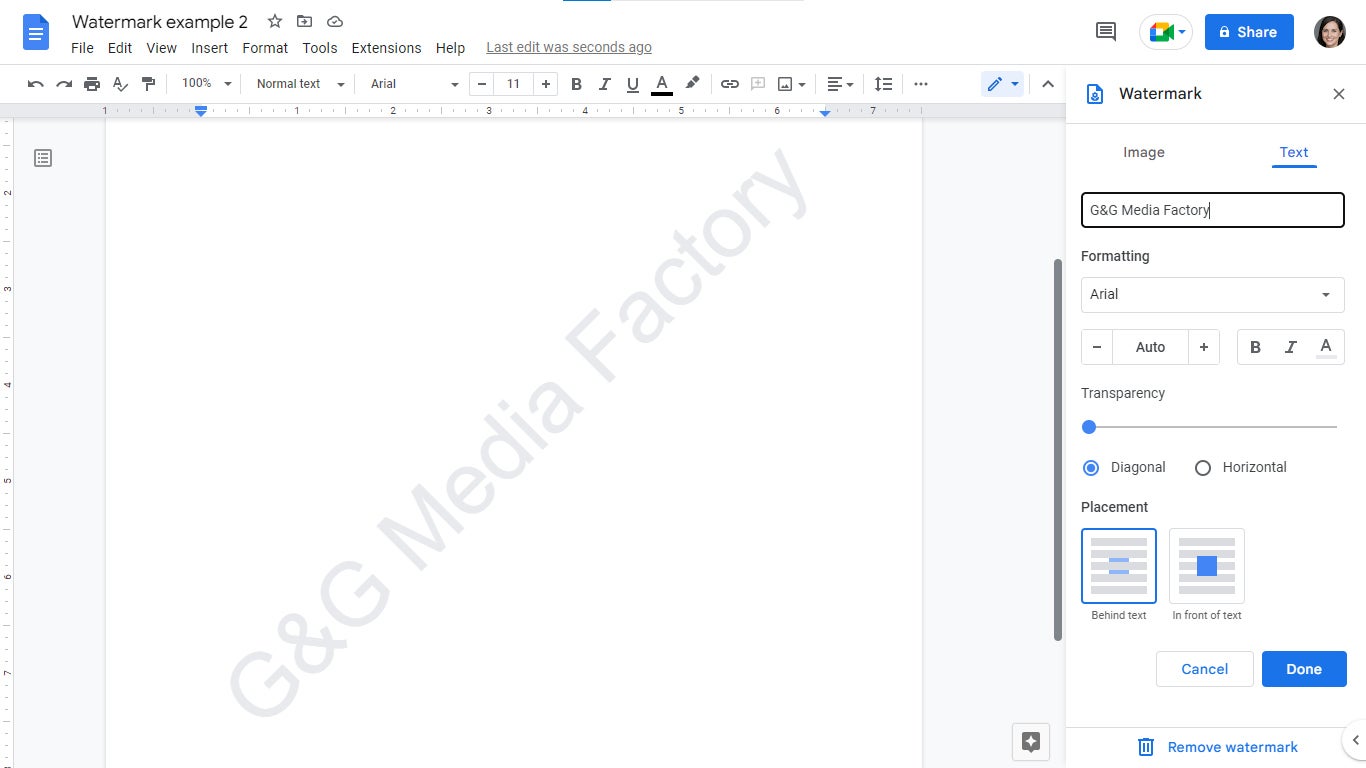
Add text as a watermark
If it isn’t open already, open the Watermark sidebar by clicking Insert > Watermark from the menu bar above your document. Then click Text at the upper right of the Watermark sidebar. This switches the sidebar to a new panel. Inside the first entry box, type in the words that you want for your watermark. The words will immediately appear as a diagonal watermark on the pages of your document, adjusting their size to fit on the page.
 Howard Wen / IDG
You can adjust a text watermark using the options in the sidebar. (Click image to enlarge it.)
Adjust a text watermark
Below the entry box for the text, you can click the various dropdown menus and buttons to change aspects of the watermark: its font, size, style, the intensity of its transparent effect, whether you want it to appear diagonally or horizontally across your pages, and even if you want it to appear over the text on a page (as opposed to behind the text, as is normally done).
When you are finished entering the text and adjusting it the way you want, click the Done button at the bottom of the sidebar.
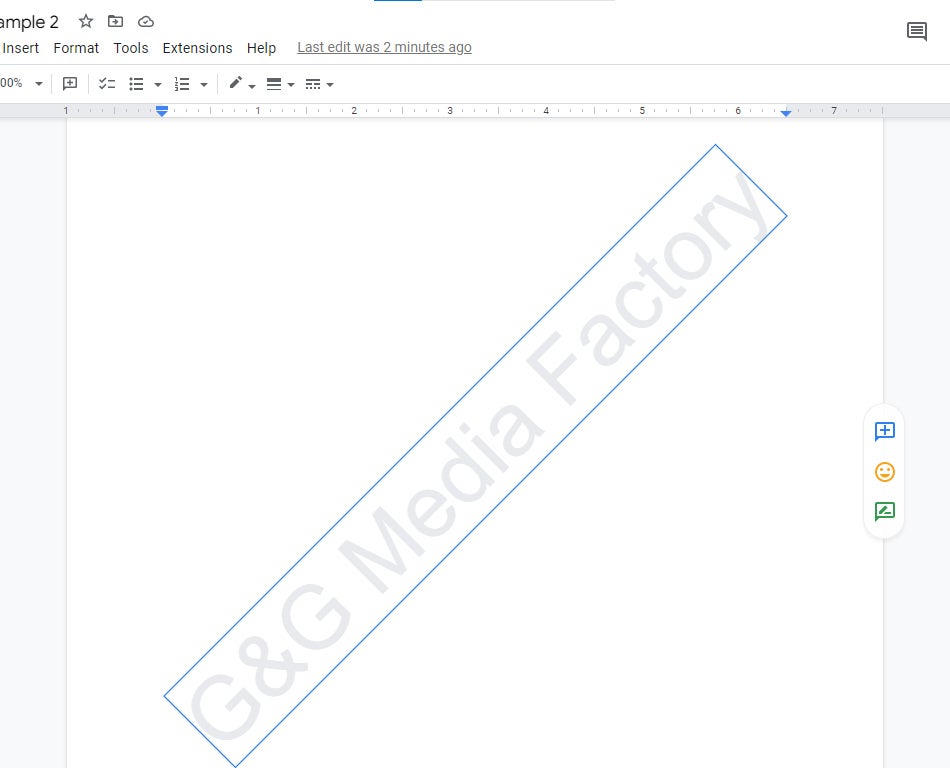
Move a text watermark
Double-click the watermark text on a page in your document to select it. When it’s selected, a frame will surround the text. Move the pointer over the text until the pointer changes to a crosshair. Click-and-hold, and then drag the watermark text to where you want it to be set on the page. Moving the watermark on one page also moves it on the other pages of your document.
 Howard Wen / IDG
Double-click a text watermark, then drag to move it. (Click image to enlarge it.)
Delete a watermark
Reopen the Watermark sidebar, then click Remove watermark at the bottom of the sidebar.
Alternatively, you can delete the watermark by double-clicking it on a page in your document to select it. When it’s selected, a frame will surround it. Press the Delete or Backspace key on your keyboard.
The watermark will be removed from all pages of your document.


