How To Update Your iPad: A Step-By-Step Guide

Keeping software updated across devices is a necessary experience of modern technology ownership, especially for Apple devices like the iPad. With an updated iPad, you can enjoy the benefits of the latest iPadOS features long after you've purchased your device. That being said, some Apple updates have caused problems for users in the past. After its 2021 Monterey macOS update, Apple had to release a patch to mitigate two zero-day vulnerabilities not long after. Earlier in 2021, Apple also issued a warning to iPhone, iPad, Mac, and Apple Watch users to update their software after it discovered problems with its WebKit browsing engine, which powers its native Safari app.
Despite this, not updating your iPad can lead to a lot of unintended issues that are similar to what happens when you don't update your iPhone. For example, you can have difficulty downloading and using both native and third-party applications, syncing with other Apple devices, and even being left defenseless to known critical security risks. Because of this, it's still recommended for the average person to update their software when possible.
Depending on your preference, there are two ways to update your iPad: the iPad Settings app or through your Mac. But, before we can proceed to walk you through those two options, here are some things you definitely need to be aware of first.
What you need to do before updating your iPad

Before you update your iPad, it's always a good idea to back up your device first, which you can do with iCloud or your computer. By backing up your iPad, you can avoid losing your photos, videos, and other important data in the event of an unexpected software issue.
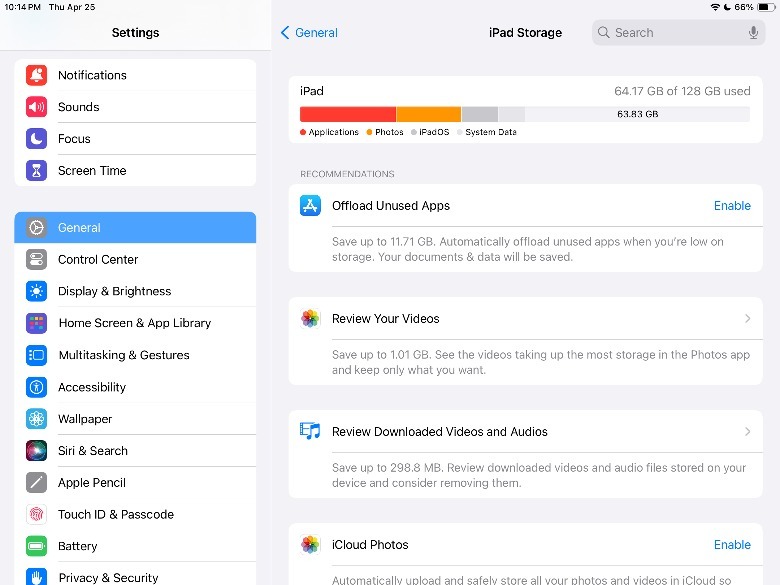
Next, you need to ensure you have enough storage space left on your device to avoid any issues with the update process. Depending on the specific software update, the amount of storage you'll need will vary, which we'll discuss how to view later in the article. Once you know how much storage you'll need for the update, you can go to your iPad Settings app and tap General > iPad Storage to see if you have enough space for it.
 Quina Baterna/SlashGear
If you find that you're a little short on space, you can look into clearing your iPad app data cache, investing in an external hard drive, subscribing to iCloud+, or utilizing other alternative cloud storage options. Then, you'll need to ensure that your iPad has access to stable internet and a power source because losing either during the update process can cause unintended problems.
How to update an iPad using the Settings app

After you've made the necessary preparations, you can start updating your iPad. The quickest and most straightforward way to update your iPad is by accessing its Settings app. Here's how to do it:
1. On your iPad, launch the Settings app.
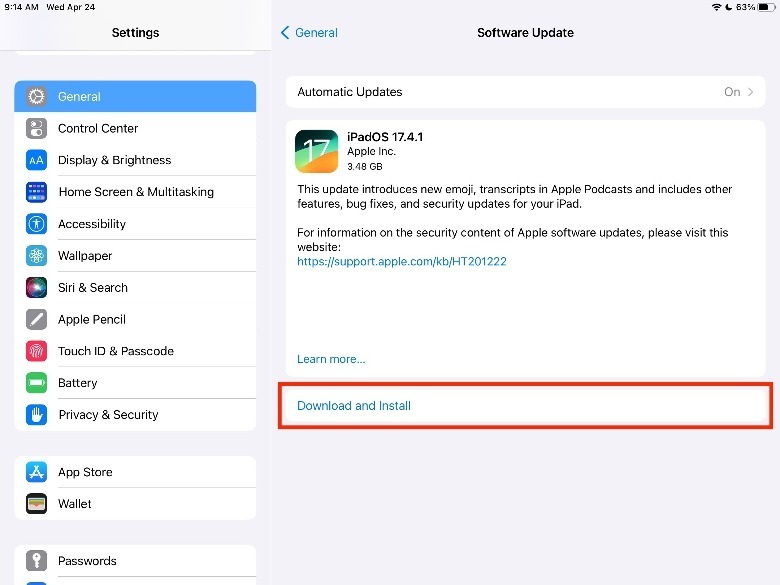
2. Tap General > Software Update.
 Quina Baterna/SlashGear
3. Under the update details, tap Download and Install.
4. If applicable, enter your iPad passcode.
5. Wait for the update to download and install.
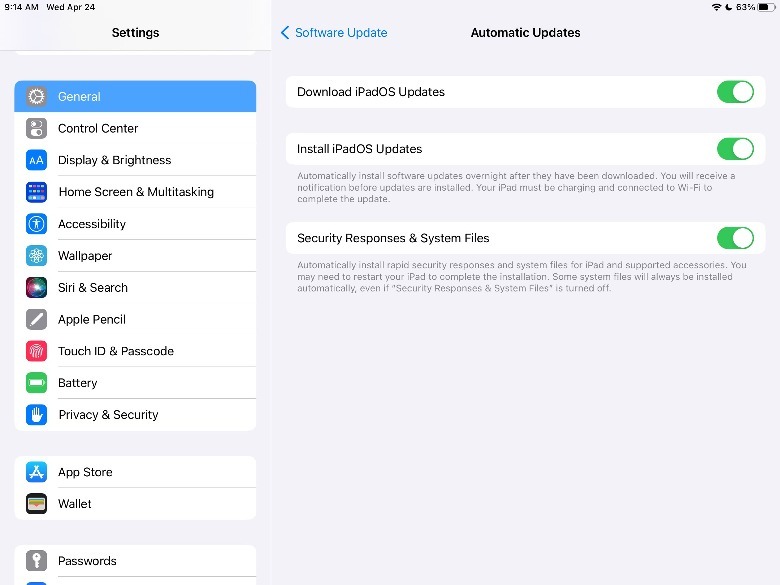
In the Software Update section, you'll also be able to access additional information, such as the size of the update file and the scope of the update. With this, you can decide if you want to update your iPadOS right away or if you'll need to make some adjustments first, such as getting more storage space. If you want to avoid the hassle of manually downloading each update, Apple also introduced the Automatic Updates feature, wherein you can configure your iPad to download iPadOS updates and automatically install downloaded updates or security responses and system files.
To enable the Automatic Updates feature, return to the Software Update section, tap Automatic Updates, and toggle on the buttons next to the features you want to enable. However, it's highly recommended that you enable the Rapid Security Responses features so your iPad can be quickly secured amid critical security threats.
 Quina Baterna/SlashGear
How to update your iPad using the Finder on your Mac

Alternatively, if you're more comfortable on your computer, here's how you can use it to update your iPad instead:
1. Connect your unlocked iPad with your Mac via a Lightning or USB-C cable.
2. On your Mac, launch a Finders window.
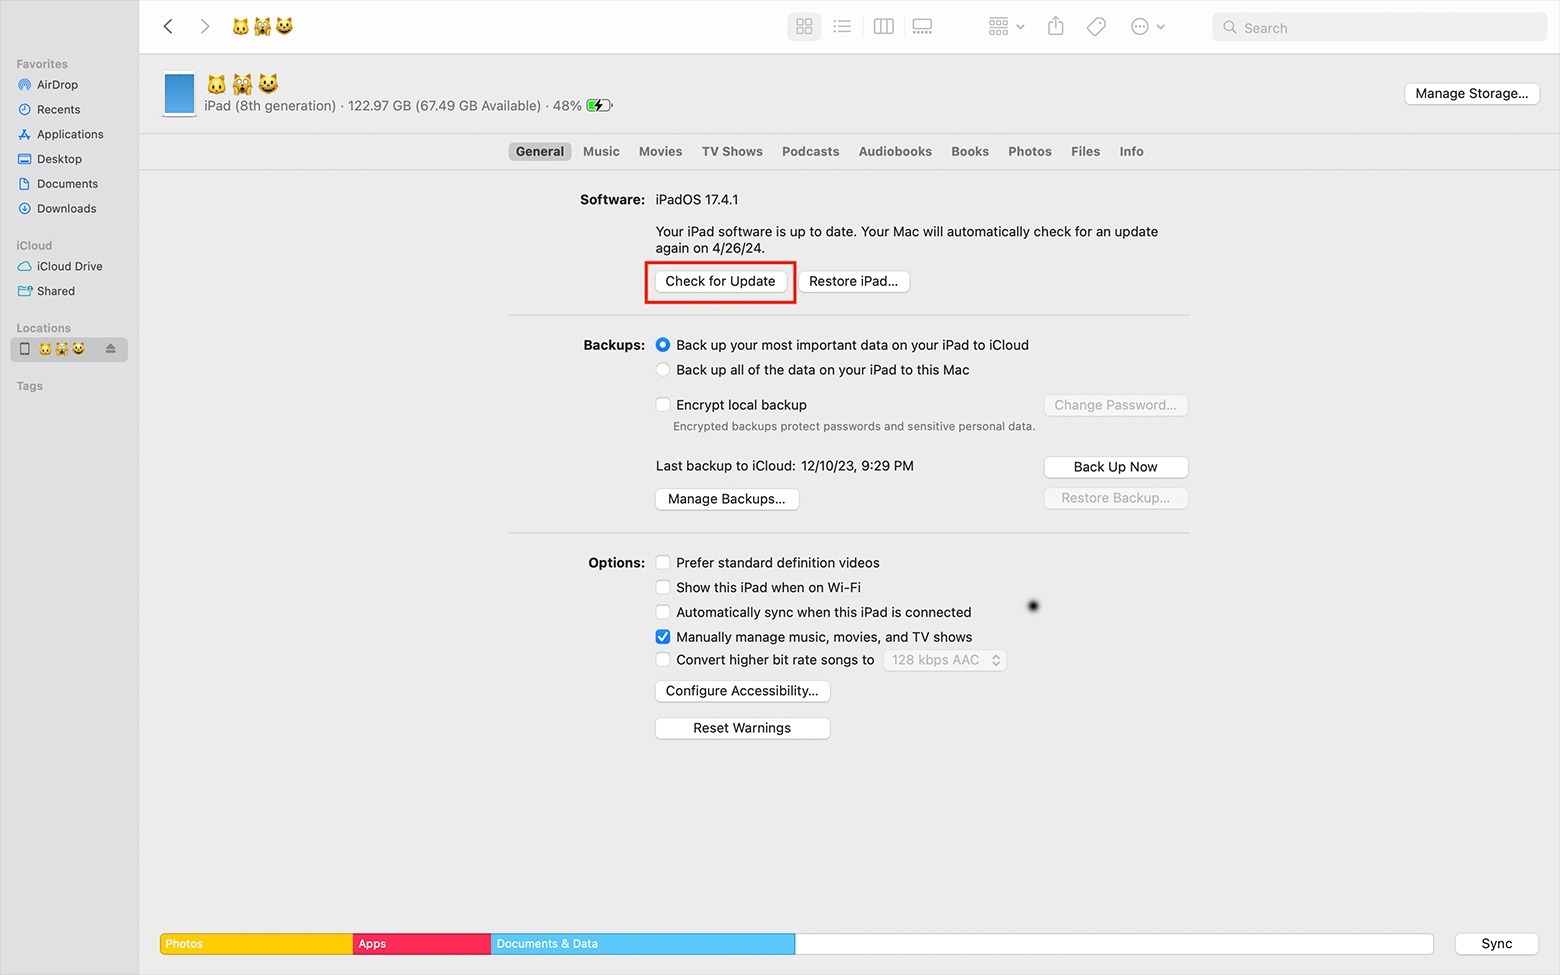
3. Under Locations, select the name of your iPad.
 Quina Baterna/SlashGear
4. Under General, click Check for Update under the Software section.
5. In the pop-up, click Download and Update.
6. Review the content of the security updates, tap Next, and then Agree to (or Decline) the terms.
7. On your iPad, enter your passcode to confirm your decision.
8. Wait for the update to download and install.
In some cases, your iPad may not be recognized by your Mac. When this happens, there are a few things you can do, like checking if there are any issues with your Lightning or USB-C cable or connection ports. Aside from cuts or exposed wires on the cable, trapped dirt and debris can cause problems with connecting your devices as well. If these are still in working order, you can also try to update your Mac's operating system, restart both devices, or enable your iPad to trust your computer. According to Apple, you may also want to test if any third-party software is causing interference in the connection, such as VPN subscriptions or security programs.
How to fix software update issues on your iPad

Unfortunately, there are plenty of reasons why your iPad won't update, even if you follow the tips and instructions above, such as if your iPad model no longer supports the latest software. To find out whether or not your specific iPad model can still be updated, you can check what iPad models are compatible with each iPadOS version on the Apple Support website. However, even if you can't download the latest update, it's recommended to update your iPad to the latest possible version for its model.
If at any point, your iPad freezes or refuses to finish the install during the update process, you might want to force restart it. Alternatively, you can also get rid of the existing update data and repeat the download process from the beginning. To do this, launch your iPad Settings app and go to General > iPad Storage. Next, find the iOS update, tap it, and select Delete Update. Then, you can repeat the steps above to get the latest version of the software for your iPad.
After you update your iPad software, some apps may request new permissions, so you'll need to manage these before you can use your iPad. But if your iPad encounters more serious problems during the update process, you can either return it to its factory settings or contact Apple Support for help.