How to Install Odoo 17 ERP Software on Rocky Linux 9
On this page
- Prerequisites
- Step 1 - Configure Firewall rules
- Step 2 - Assign Hostnames
- Step 3 - Install and Configure PostgreSQL
- Step 4 - Install Odoo
- Step 5 - Configure Odoo
- Step 6 - Install and Configure Nginx
- Step 7 - Install SSL
- Step 8 - Configure Nginx
- Step 9 - Start Odoo
- Step 10 - Update Odoo
- Step 11 - Secure Odoo using Fail2Ban
- Conclusion
Odoo (formerly known as OpenERP) is a self-hosted suite of over 10,000 open-source applications for various business needs, including CRM, eCommerce, accounting, inventory, project management, and point of sale. These applications are fully integrated and accessed through a familiar web interface.
This tutorial will teach us to install Odoo 16 Stack on a Rocky Linux 9 server.
Prerequisites
-
A Rocky Linux 9 server with a minimum of 2GB RAM to host Odoo Stack.
-
A second Rocky Linux 9 server with a minimum of 2GB RAM for hosting the PostgreSQL database. You can, however, install the database on the same server as Odoo, but for production environments, it is highly recommended that you install it on a separate server. You can also choose any of the managed database options available from any provider of your choice.
-
RAM requirement will depend on the number of concurrent users that will be using the stack. A detailed guide on how to calculate system requirements can be found in Odoo's documentation.
-
Keep your systems updated.
$ sudo dnf update
-
A non-root user with sudo privileges on both servers.
-
Fail2Ban should be installed. This step is optional. You can follow our guide on installing Fail2Ban on Rocky Linux for the same.
-
SELinux should be disabled.
-
Few packages that your systems need.
$ sudo dnf install wget curl nano unzip yum-utils policycoreutils-python-utils -y
Some of these packages may already be installed on your system.
Step 1 - Configure Firewall rules
The first step is to configure the firewall. Rocky Linux uses Firewalld Firewall. For this tutorial, we will assume you have Firewalld firewall installed on both servers.
Check the firewall's status.
$ sudo firewall-cmd --state
running
The firewall works with different zones, and the public zone is the default one that we will use. List all the services and ports active on the firewall.
$ sudo firewall-cmd --zone=public --list-all
It should show the following output.
public
  target: default
  icmp-block-inversion: no
  interfaces: eth0
  sources:
  services: cockpit dhcpv6-client ssh
  ports:
  protocols:
  forward: yes
  masquerade: no
  forward-ports:
  source-ports:
  icmp-blocks:
  rich rules:
On the Odoo server, we will need ports 22, 80, 443, 6010, 5432, and 8069 to be open. 22 is used for SSH, 80 is for HTTP, 443 is for HTTPS, 6010 is used for Odoo communication, 5432 is used by PostgreSQL and 8069 is used for Odoo server application.
Run the following commands to open the required ports on the Odoo server.
$ sudo firewall-cmd --zone=public --add-port={6010,5432,8069,8072}/tcp
$ sudo firewall-cmd --zone=public --add-service=http
$ sudo firewall-cmd --zone=public --add-service=https
Check the status of the firewall.
$ sudo firewall-cmd --zone=public --list-all
public (active)
  target: default
  icmp-block-inversion: no
  interfaces: eth0
  sources:
  services: cockpit dhcpv6-client http https ssh
  ports: 6010/tcp 5432/tcp 8069/tcp 8072/tcp
  protocols:
  forward: yes
  masquerade: no
  forward-ports:
  source-ports:
  icmp-blocks:
  rich rules:
On the PostgreSQL server, we need to open ports 22, 6010, and 5432. Open them using the following commands.
$ sudo firewall-cmd --zone=public --add-port={6010,5432}/tcp
Make all the changes permanent and reload the firewall to enable the changes.
$ sudo firewall-cmd --runtime-to-permanent
$ sudo firewall-cmd --reload
Step 2 - Assign Hostnames
You can either use the IP addresses of the servers or use their Fully Qualified Domain Names (FQDN), if available. For our tutorial, we will be using FQDNs and for that, we need to set hostnames on both servers.
Set the hostname on the Odoo server using the following command.
$ sudo hostnamectl set-hostname odoo.yourdomain.com
Set the hostname on the PostgreSQL server using the following command.
$ sudo hostnamectl set-hostname postgresql.yourdomain.com
On the Odoo server, open the /etc/hosts file.
$ sudo nano /etc/hosts
Make sure, it looks like the following.
127.0.0.1 	localhost
127.0.0.1	odoo.yourdomain.com		odoo
10.1.1.10	postgresql.yourdomain.com	postgresql
On the PostgreSQL server, open the file and make sure it looks like the following.
127.0.0.1 	localhost
127.0.0.1	postgresql.yourdomain.com	postgresql
10.1.2.10	odoo.yourdomain.com		odoo
Press Ctrl + X to close the editor and press Y when prompted to save the file.
Step 3 - Install and Configure PostgreSQL
Rocky Linux 9 ships with PostgreSQL 13 by default and PostgreSQL 15 as the postgresql:15 module stream. However, we will install the latest version available at the time of writing this tutorial, PostgreSQL 16 from its official repository.
Install the PostgreSQL repository RPM.
$ sudo dnf install -y https://download.postgresql.org/pub/repos/yum/reporpms/EL-9-x86_64/pgdg-redhat-repo-latest.noarch.rpm
Disable the built-in PostgreSQL module.
$ sudo dnf -qy module disable postgresql
Install PostgreSQL 16.
$ sudo dnf install -y postgresql16-server postgresql16-contrib
Initialize the database.
$ sudo /usr/pgsql-16/bin/postgresql-16-setup initdb
Enable and start the PostgreSQL service.
$ sudo systemctl enable postgresql-16
$ sudo systemctl start postgresql-16
Check the status of the service.
$ sudo systemctl status postgresql-16
You should get a similar output.
? postgresql-16.service - PostgreSQL 16 database server
     Loaded: loaded (/usr/lib/systemd/system/postgresql-16.service; enabled; preset: disabled)
     Active: active (running) since Sun 2024-04-07 02:22:42 UTC; 3s ago
       Docs: https://www.postgresql.org/docs/16/static/
    Process: 8673 ExecStartPre=/usr/pgsql-16/bin/postgresql-16-check-db-dir ${PGDATA} (code=exited, status=0/SUCCESS)
   Main PID: 8678 (postgres)
      Tasks: 7 (limit: 10819)
     Memory: 17.4M
        CPU: 60ms
     CGroup: /system.slice/postgresql-16.service
             ??8678 /usr/pgsql-16/bin/postgres -D /var/lib/pgsql/16/data/
             ??8679 "postgres: logger "
             ??8680 "postgres: checkpointer "
             ??8681 "postgres: background writer "
             ??8683 "postgres: walwriter "
             ??8684 "postgres: autovacuum launcher "
             ??8685 "postgres: logical replication launcher "

Apr 07 02:22:42 postgresql systemd[1]: Starting PostgreSQL 16 database server...
Apr 07 02:22:42 postgresql postgres[8678]: 2024-04-07 02:22:42.370 UTC [8678] LOG:  redirecting log output to logging collector process
Apr 07 02:22:42 postgresql postgres[8678]: 2024-04-07 02:22:42.370 UTC [8678] HINT:  Future log output will appear in directory "log".
Apr 07 02:22:42 postgresql systemd[1]: Started PostgreSQL 16 database server.
Next, we need to create a database user odoo. You will be asked for a password for the role. Enter a strong password of your choice.
$ sudo -u postgres createuser odoo -U postgres -dP
The option -u executes the command as postgres user.
The option -U indicates the user name to connect as.
The option -d grants the user permission to create databases.
The option -p prompts for the new user's password.
Configure Host-Based Authentication
We need to give permission to the PostgreSQL service to be able to connect to the Odoo server.
First, stop the PostgreSQL service.
$ sudo systemctl stop postgresql-16
To find where PostgreSQL stores the Client Authentication file, run the following command to start the PostgreSQL shell.
$ sudo -u postgres psql
Run the following query to find the location of the file.
postgres=# SHOW hba_file;
You will receive the following output.
              hba_file
------------------------------------
 /var/lib/pgsql/16/data/pg_hba.conf
(1 row)
Type exit to quit the shell.
Open the file /var/lib/pgsql/16/data/pg_hba.conf for editing.
$ sudo nano /var/lib/pgsql/16/data/pg_hba.conf
Paste the following line at the end.
host all odoo odoo.yourdomain.com scram-sha-256
This line grants permission to the odoo user to connect to all the databases within this server. You can specify the name of the databases too instead of using the all keyword.
Press Ctrl + X to close the editor and press Y when prompted to save the file.
Configure PostgreSQL Listening address
Next, we need to allow the database server to listen to remote connections.
Start the PostgreSQL shell and run the following command to locate the PostgreSQL configuration file.
$ sudo -u postgres psql
postgres=# SHOW config_file;
You will receive the following output.
              config_file
----------------------------------------
 /var/lib/pgsql/16/data/postgresql.conf
(1 row)
Type exit to quit the shell.
Open the file /var/lib/pgsql/16/data/postgresql.conf for editing.
$ sudo nano /var/lib/pgsql/16/data/postgresql.conf
Change the line listen_addresses from
#listen_addresses = 'localhost' # what IP address(es) to listen on;
to.
listen_addresses = '*'
The * means it will listen to all the IP addresses. You can change it to the IP address of your odoo instance.
listen_addresses = 'localhost, <odoo_server_ip>'
Press Ctrl + X to close the editor and press Y when prompted to save the file.
Enable and Start the PostgreSQL service
Since our configuration is finished, it is time to start the PostgreSQL service.
$ sudo systemctl start postgresql-16
Step 4 - Install Odoo
Install Python 3.10
Rocky Linux 9 ships with Python 3.9 whereas Odoo 17 requires Python 3.10 and above. Therefore, we need to install that first.
You can check the currently available version first.
$ python --version
Python 3.9.18
Install required dependencies for Python.
$ sudo dnf groupinstall "Development Tools"
$ sudo dnf install readline-devel ncurses-devel openssl-devel sqlite-devel tk-devel gdbm-devel libc6-dev libbz2-dev libffi-dev zlib1g-dev
$ sudo dnf install -y openssl-devel bzip2-devel libffi-devel readline-devel ncurses-devel sqlite-devel tk-devel
Download the source code from Python's website. At the time of writing this tutorial, the latest 3.10.x version available is 3.10.14 which is what we used.
$ wget https://www.python.org/ftp/python/3.10.14/Python-3.10.14.tgz
Extract the archive.
$ tar xzf Python-3.10.14.tgz
Switch to the extracted directory.
$ cd Python-3.10.14
Configure the source code.
$ ./configure --enable-optimizations
Install Python 3.10.14. The altininstall command is used so that it doesn't overwrite the system's Python version.
$ sudo make altinstall
Confirm the installation.
$ python3.10 -V
OR
$ python3.10 --version
You should get the following output.
Python 3.10.14
Next, we need to set Python 3.10 as the default Python version. Create symbolic links for each Python version installed on your server. While creating the symbolic version, you should include the exact version of Python in your commands. Run the following commands to create the symbolic links.
$ sudo update-alternatives --install /usr/bin/python3 python3 /usr/local/bin/python3.10 1
$ sudo update-alternatives --install /usr/bin/python3 python3 /usr/bin/python3.9 2
To view the available Python versions, use the following command.
$ sudo update-alternatives --config python3
You should see the following output.
There are 2 programs which provide 'python3'.

  Selection    Command
-----------------------------------------------
   1           /usr/local/bin/python3.10
*+ 2           /usr/bin/python3.9

Enter to keep the current selection[+], or type selection number:
Select number 1 to switch to Python 3.10.
Log out and Log in back to the terminal to switch to the Python version. You can now use Python 3.10.14 by using python directly.
Install dependencies and Prepare for installation
Create a new system user for managing the Odoo processes on the Odoo server with the home directory as /opt/odoo. This is to prevent any security risk by running it under the root user.
$ sudo useradd -m -d /opt/odoo -U -r -s /bin/bash odoo
Install system dependencies required for Odoo 17 setup.
$ sudo dnf install -y git libxslt-devel bzip2-devel openldap-devel libjpeg-devel freetype-devel libpq-devel
Install Nodejs. Rocky Linux 9 ships with Node 18.x which is the current LTS version of Nodejs. However, we will use the official Nodesource repository for it.
Add the Node 20 repository.
$ curl -fsSL https://rpm.nodesource.com/setup_20.x | sudo bash -
Install Nodejs.
$ sudo dnf -y install nodejs
Confirm the Node version.
$ node --version
v20.12.1
Install Less CSS package using Node. If you are using a language with right-to-left interface, install the rtlcss package as well.
$ sudo npm install -g less rtlcss
Install wkhtmltopdf. We will use the RPM package from the Wkhtmltopdf GitHub packaging repository. The latest version available at the time of writing this tutorial is 0.12.6.1 r3.
Download the Wkhtmltopdf RPM.
$ cd ~
$ wget https://github.com/wkhtmltopdf/packaging/releases/download/0.12.6.1-3/wkhtmltox-0.12.6.1-3.almalinux9.x86_64.rpm
Install fonts required by Wkhtmltopdf.
$ sudo dnf install xorg-x11-fonts-75dpi.noarch xorg-x11-fonts-Type1.noarch
Install Wkhtmltopdf.
$ sudo rpm -i wkhtmltox-0.12.6.1-3.almalinux9.x86_64.rpm
Check the version of wkhtmltopdf installed.
$ wkhtmltopdf --version
wkhtmltopdf 0.12.6.1 (with patched qt)
Download Odoo Files
Switch to the Odoo system user.
$ sudo su - odoo
Clone Odoo's Github repository onto your system.
$ git clone https://github.com/odoo/odoo.git --depth 1 --branch 17.0 --single-branch
For our purpose, we are copying Odoo to the /opt/odoo directory from where it will be installed. This will create the /opt/odoo/odoo directory which we will use for the installation.
Set up Virtualenv Python Environment
This step is optional but is recommended since a virtual Python environment for Odoo will help avoid conflicts with Python modules of the Operating system, especially when performing OS upgrades.
For this, we will use virtualenv.
-
Create a new
virtualenvenvironment for Odoo.$ python3 -m venv odoo-env
-
Activate the virtual environment. We are creating an environment under the system user's home directory. You are free to choose any location you like.
$ source odoo-env/bin/activate
-
Update PIP just in case.
(odoo-env) $ pip3 install --upgrade pip
-
Install Python's wheel in the virtual environment.
$ pip3 install wheel
Install Python Dependencies
Install the Python dependencies required by Odoo 17.
$ pip3 install -r /opt/odoo/odoo/requirements.txt
The requirements will take some time to install so be patient.
Check whether the requirements are installed correctly by checking the list of installed Python modules.
$ pip3 list
Package           Version
----------------- --------
attrs             23.2.0
Babel             2.9.1
beautifulsoup4    4.12.3
cached-property   1.5.2
certifi           2024.2.2
cffi              1.16.0
chardet           4.0.0
cryptography      3.4.8
decorator         4.4.2
docopt            0.6.2
docutils          0.17
ebaysdk           2.1.5
freezegun         1.1.0
geoip2            2.9.0
gevent            21.8.0
greenlet          1.1.2
idna              2.10
isodate           0.6.1
Jinja2            3.0.3
libsass           0.20.1
lxml              4.8.0
MarkupSafe        2.0.1
maxminddb         2.6.0
num2words         0.5.10
ofxparse          0.21
passlib           1.7.4
Pillow            9.0.1
pip               24.0
platformdirs      4.2.0
polib             1.1.1
psutil            5.9.0
psycopg2          2.9.2
pyasn1            0.6.0
pyasn1_modules    0.4.0
pycparser         2.22
pydot             1.4.2
pyOpenSSL         21.0.0
pyparsing         3.1.2
PyPDF2            1.26.0
pyserial          3.5
python-dateutil   2.8.1
python-ldap       3.4.0
python-stdnum     1.17
pytz              2024.1
pyusb             1.2.1
qrcode            7.3.1
reportlab         3.6.8
requests          2.25.1
requests-file     2.0.0
requests-toolbelt 1.0.0
rjsmin            1.1.0
setuptools        65.5.0
six               1.16.0
soupsieve         2.5
urllib3           1.26.5
vobject           0.9.6.1
Werkzeug          2.0.2
wheel             0.43.0
xlrd              1.2.0
XlsxWriter        3.0.2
xlwt              1.3.0
zeep              4.1.0
zope.event        5.0
zope.interface    6.2
Exit the Python virtual environment.
$ deactivate
Create a directory for 3rd party addons
$ mkdir /opt/odoo/odoo/custom-addons
This directory should be added to the addons_path parameter that defines the directories where Odoo looks for modules. Exit the Odoo system user.
$ exit
Step 5 - Configure Odoo
Copy the default Odoo configuration file to create a new one.
$ sudo cp /opt/odoo/odoo/debian/odoo.conf /etc/odoo.conf
Open the file for editing.
$ sudo nano /etc/odoo.conf
Edit the file so that it looks like the following.
[options]
; This is the password that allows database operations:
admin_passwd = admin
db_host = postgresql.yourdomain.com
db_port = False
db_user = odoo
db_password = odoo_password
addons_path = /opt/odoo/odoo/addons, /opt/odoo/odoo/custom-addons
xmlrpc_port = 8069
default_productivity_apps = True
Press Ctrl + X to close the editor and press Y when prompted to save the file.
The option admin_passwd is the password that allows administrative operations within the Odoo GUI. Be sure to choose a secure password.
The option db_host is the FQDN or the IP address of the PostgreSQL server.
The option db_port is set to false since the default PostgreSQL port 5432 is being used. If you want to use a different port, you will need to update this value.
The option db_user is the name of the PostgreSQL user.
The option db_password is the PostgreSQL 'odoo' user password we created previously on the PostgreSQL server.
The option addons_path is the default Addons path. You can also add a custom path for Addons separating them with commas.
The option xmlrpc_port is the port that Odoo listens on.
The option default_productivity_apps makes sure the default productivity apps (namely Employees, Email Marketing, Project, and Surveys) remain enabled. These four apps are the default on the Odoo Community Edition. On the Enterprise edition, there are additional productivity apps that can be enabled by default which are Appointments, Knowledge, Planning, and Sign.
Create Odoo service
To make sure Odoo keeps running even after a system restarts, we need to create a service for it.
Create a file /lib/systemd/system/odoo-server.service and open it for editing.
$ sudo nano /lib/systemd/system/odoo-server.service
Paste the following code in it.
[Unit]
Description=Odoo Open Source ERP and CRM
Requires=postgresql-16.service
After=network.target postgresql-16.service

[Service]
Type=simple
SyslogIdentifier=odoo-server
User=odoo
Group=odoo
ExecStart=/opt/odoo/odoo-env/bin/python3 /opt/odoo/odoo/odoo-bin --config=/etc/odoo.conf --addons-path=/opt/odoo/odoo/addons/ --logfile /var/log/odoo/odoo-server.log
WorkingDirectory=/opt/odoo/odoo/
StandardOutput=journal+console
KillMode=mixed

[Install]
WantedBy=multi-user.target
Replace /home/<username> with the location you chose for installing the Python Virtual Environment.
Press Ctrl + X to close the editor and press Y when prompted to save the file.
Create a Log directory for Odoo
$ sudo mkdir /var/log/odoo
Set File permissions
Set permissions on the odoo-server.service file so that only Odoo users can read or execute it.
$ sudo chmod 755 /lib/systemd/system/odoo-server.service
$ sudo chown odoo: /lib/systemd/system/odoo-server.service
Set the ownership on the Python environment, the Odoo installation, and the log directory.
$ sudo chown -R odoo: /opt/odoo/
$ sudo chown -R odoo: /opt/odoo/odoo-env
$ sudo chown -R odoo: /var/log/odoo
Restrict the Odoo configuration file.
$ sudo chown odoo: /etc/odoo.conf
$ sudo chmod 640 /etc/odoo.conf
Start the Odoo server
Start and enable the Odoo server.
$ sudo systemctl start odoo-server
$ sudo systemctl enable odoo-server
Check the status of the server.
$ sudo systemctl status odoo-server
? odoo-server.service - Odoo Open Source ERP and CRM
     Loaded: loaded (/usr/lib/systemd/system/odoo-server.service; enabled; preset: disabled)
     Active: active (running) since Tue 2024-04-09 23:59:38 UTC; 1s ago
   Main PID: 102598 (python3)
      Tasks: 4 (limit: 10736)
     Memory: 69.6M
        CPU: 895ms
     CGroup: /system.slice/odoo-server.service
             ??102598 /opt/odoo/odoo-env/bin/python3 /opt/odoo/odoo/odoo-bin --config=/etc/odoo.conf --addons-path=/opt/odoo/odoo/addons/ --logfile /var/log/odoo/odoo-server.log

Apr 09 23:59:38 odoo.yourdomain.com systemd[1]: Started Odoo Open Source ERP and CRM.
Step 6 - Install and Configure Nginx
Rocky Linux 9 ships with an older version of Nginx. You need to use the official Nginx repository to install the latest version.
Create and open the file /etc/yum.repos.d/nginx.repo for editing.
$ sudo nano /etc/yum.repos.d/nginx.repo
Paste the following code in it.
[nginx-stable]
name=nginx stable repo
baseurl=http://nginx.org/packages/centos/$releasever/$basearch/
gpgcheck=1
enabled=0
gpgkey=https://nginx.org/keys/nginx_signing.key
module_hotfixes=true

[nginx-mainline]
name=nginx mainline repo
baseurl=http://nginx.org/packages/mainline/centos/$releasever/$basearch/
gpgcheck=1
enabled=1
gpgkey=https://nginx.org/keys/nginx_signing.key
module_hotfixes=true
Once you are finished, save the file by pressing Ctrl + X and entering Y when prompted. We will use the mainline version of Nginx and therefore have enabled the mainline repo in the above file by using enabled=1 under the mainline section instead of the stable one. You can choose either one.
Install Nginx.
$ sudo dnf install -y nginx
Verify the installation.
$ nginx -v
nginx version: nginx/1.25.4
Enable and start the Nginx server service.
$ sudo systemctl enable nginx --now
Check the service status.
$ sudo systemctl status nginx
? nginx.service - nginx - high performance web server
     Loaded: loaded (/usr/lib/systemd/system/nginx.service; enabled; preset: disabled)
     Active: active (running) since Wed 2024-04-10 06:52:14 UTC; 3s ago
       Docs: http://nginx.org/en/docs/
    Process: 103452 ExecStart=/usr/sbin/nginx -c /etc/nginx/nginx.conf (code=exited, status=0/SUCCESS)
   Main PID: 103453 (nginx)
      Tasks: 3 (limit: 10736)
     Memory: 3.1M
        CPU: 17ms
     CGroup: /system.slice/nginx.service
             ??103453 "nginx: master process /usr/sbin/nginx -c /etc/nginx/nginx.conf"
             ??103454 "nginx: worker process"
             ??103455 "nginx: worker process"
Step 7 - Install SSL
We need to install Certbot to generate free SSL certificates offered by Let's Encrypt. We will use the Snapd package installer for that. It requires the EPEL (Extra Packages for Enterprise Linux) repository to work.
Install EPEL repository.
$ sudo dnf install -y epel-release
Rocky Linux 9 doesn't come with Snapd installed. Install Snapd package.
$ sudo dnf install -y snapd
Enable and Start the Snap service.
$ sudo systemctl enable snapd --now
Install the Snap core package, and ensure that your version of Snapd is up to date.
$ sudo snap install core
$ sudo snap refresh core
Create necessary links for Snapd to work.
$ sudo ln -s /var/lib/snapd/snap /snap
$ echo 'export PATH=$PATH:/var/lib/snapd/snap/bin' | sudo tee -a /etc/profile.d/snapd.sh
Install Certbot.
$ sudo snap install --classic certbot
Use the following command to ensure that the Certbot command can be run by creating a symbolic link to the /usr/bin directory.
$ sudo ln -s /snap/bin/certbot /usr/bin/certbot
Verify if Certbot is functioning properly.
$ certbot --version
certbot 2.10.0
Generate the certificate. We also need to create a DHParams certificate.
$ sudo certbot certonly --nginx --agree-tos --no-eff-email --staple-ocsp --preferred-challenges http -m [email protected] -d odoo.yourdomain.com
Generate a Diffie-Hellman Key-exchange certificate.
$ sudo openssl dhparam -dsaparam -out /etc/ssl/certs/dhparam.pem 4096
Check the Certbot renewal scheduler service.
$ sudo systemctl list-timers
You will find snap.certbot.renew.service as one of the services scheduled to run.
NEXT                        LEFT          LAST                        PASSED   UNIT                         ACTIVATES
....                        ....          ....                        ......   ....                         .........
Wed 2024-04-10 13:32:11 UTC 1h 42min left Wed 2024-04-10 11:43:41 UTC 5min ago dnf-makecache.timer          dnf-makecache.service
Wed 2024-04-10 19:08:00 UTC 7h left       -                           -        snap.certbot.renew.timer     snap.certbot.renew.service
Thu 2024-04-11 00:00:00 UTC 12h left      Wed 2024-04-10 00:00:36 UTC 11h ago  logrotate.timer              logrotate.service
Do a dry run of the process to check whether the SSL renewal is working fine.
$ sudo certbot renew --dry-run
If you see no errors, you are all set. Your certificate will renew automatically.
Step 8 - Configure Nginx
To run it via Nginx, we need to run Odoo on localhost. To change that, stop the Odoo service.
$ sudo systemctl stop odoo-server
Open the Odoo server configuration file.
$ sudo nano /etc/odoo.conf
Add the following lines to it.
xmlrpc_interface = 127.0.0.1
proxy_mode = True
Create an Nginx configuration file for Odoo.
$ sudo nano /etc/nginx/conf.d/odoo.conf
Paste the code below.
#odoo server
upstream odoo {
 server 127.0.0.1:8069;
}
upstream odoochat {
 server 127.0.0.1:8072;
}
map $http_upgrade $connection_upgrade {
  default upgrade;
  ''      close;
}
map $sent_http_content_type $content_type_csp {
    default "";
    ~image/ "default-src 'none'";
}

# http -> https
server {
   listen 80;
   listen [::]:80;
   server_name odoo.yourdomain.com;
   return 301 https://$host$request_uri;
}

server {
 listen 443 ssl;
 listen [::]:443 ssl;
 http2 on;
 http3 on;
 quic_retry on;

 server_name odoo.yourdomain.com;

 proxy_read_timeout 720s;
 proxy_connect_timeout 720s;
 proxy_send_timeout 720s;

 # Add Headers for odoo proxy mode
 proxy_set_header X-Forwarded-Host $host;
 proxy_set_header X-Forwarded-For $proxy_add_x_forwarded_for;
 proxy_set_header X-Forwarded-Proto $scheme;
 proxy_set_header X-Real-IP $remote_addr;

 # SSL parameters
 ssl_certificate /etc/letsencrypt/live/odoo.yourdomain.com/fullchain.pem;
 ssl_certificate_key /etc/letsencrypt/live/odoo.yourdomain.com/privkey.pem;
 ssl_trusted_certificate /etc/letsencrypt/live/odoo.yourdomain.com/chain.pem;

 ssl_session_timeout 30m;
 ssl_session_cache shared:MozSSL:10m;  # about 40000 sessions
 ssl_session_tickets off;

 ssl_protocols TLSv1.2 TLSv1.3;
 ssl_ciphers ECDHE-ECDSA-AES128-GCM-SHA256:ECDHE-RSA-AES128-GCM-SHA256:ECDHE-ECDSA-AES256-GCM-SHA384:ECDHE-RSA-AES256-GCM-SHA384:ECDHE-ECDSA-CHACHA20-POLY1305:ECDHE-RSA-CHACHA20-POLY1305:DHE-RSA-AES128-GCM-SHA256:DHE-RSA-AES256-GCM-SHA384;
 ssl_ecdh_curve X25519:prime256v1:secp384r1:secp521r1;
 ssl_prefer_server_ciphers off;
 ssl_stapling on;
 ssl_stapling_verify on;
 ssl_dhparam /etc/ssl/certs/dhparam.pem;

 # log
 access_log /var/log/nginx/odoo.access.log;
 error_log /var/log/nginx/odoo.error.log;

 # Redirect longpoll requests to odoo longpolling port
 location /longpolling {
   proxy_pass http://odoochat;
 }

 location /websocket {
   proxy_pass http://odoochat;
   proxy_set_header Upgrade $http_upgrade;
   proxy_set_header Connection $connection_upgrade;
   proxy_set_header X-Forwarded-Host $http_host;
   proxy_set_header X-Forwarded-For $proxy_add_x_forwarded_for;
   proxy_set_header X-Forwarded-Proto $scheme;
   proxy_set_header X-Real-IP $remote_addr;
   proxy_cookie_flags session_id samesite=lax secure;  # requires nginx 1.19.8
 }

 # Redirect requests to odoo backend server
 location / {
  # Add Headers for odoo proxy mode
   proxy_set_header X-Forwarded-Host $http_host;
   proxy_set_header X-Forwarded-For $proxy_add_x_forwarded_for;
   proxy_set_header X-Forwarded-Proto $scheme;
   proxy_set_header X-Real-IP $remote_addr;
   proxy_redirect off;
   proxy_pass http://odoo;
   proxy_cookie_flags session_id samesite=lax secure;  # requires nginx 1.19.8
 }

 # common gzip
 gzip_types text/css text/scss text/plain text/xml application/xml application/json application/javascript;
 gzip on;

 # Serve static files right away
 location ~ ^/[^/]+/static/.+$ {
   # root and try_files both depend on your addons paths
   root /opt/odoo/odoo;
   try_files /opt/odoo/odoo/addons$uri @odoo;
   expires 24h;
   add_header Content-Security-Policy $content_type_csp;
 }
}
Press Ctrl + X to close the editor and press Y when prompted to save the file.
Open the file /etc/nginx/nginx.conf for editing.
$ sudo nano /etc/nginx/nginx.conf
Add the following line before the line include /etc/nginx/conf.d/*.conf;.
server_names_hash_bucket_size 64;
Save the file by pressing Ctrl + X and entering Y when prompted.
Test the Nginx configuration.
$ sudo nginx -t
If you see no errors, it means you are good to go. Restart the Nginx server.
$ sudo systemctl restart nginx
Step 9 - Start Odoo
We can start the Odoo server again after everything is set up.
$ sudo systemctl start odoo-server
Launch Odoo in your browser via https://odoo.yourdomain.com. In your browser, open the URL http://<yourIPaddress>:8069 or http://odoo.yourdomain.com:8069. You should see Odoo's database creation screen if everything is working properly.
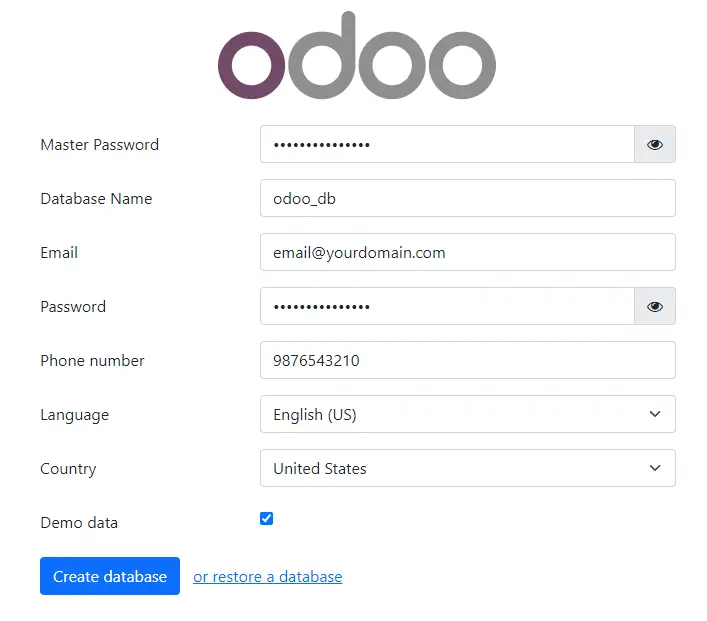
Choose your email and password to create your login credentials. The master password is the admin_passwd which you added in the /etc/odoo.conf file. Fill in all the remaining fields.
Check the Demo Data field to populate the database with sample data. Do not install demo data on internet-facing servers. Databases with demo data contain default logins and passwords that can be used to get into your systems and cause significant trouble, even on staging/dev systems. We are using it only for tutorial purposes.
Click the Create database button to proceed to complete the installation. The first time you create a database, the addons page will take time to load so don't refresh the page. You will be redirected automatically to the following login page once the database is created.
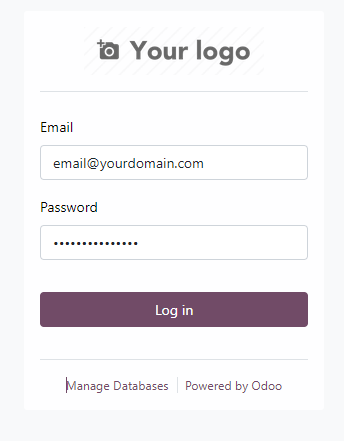
Enter the credentials used in the previous step to log in to the Odoo ERP and you will be taken to the dashboard page as shown below. It will be pre-filled with demo data. If you haven't checked the demo data option on the database creation page, you will get a different and much cleaner dashboard.
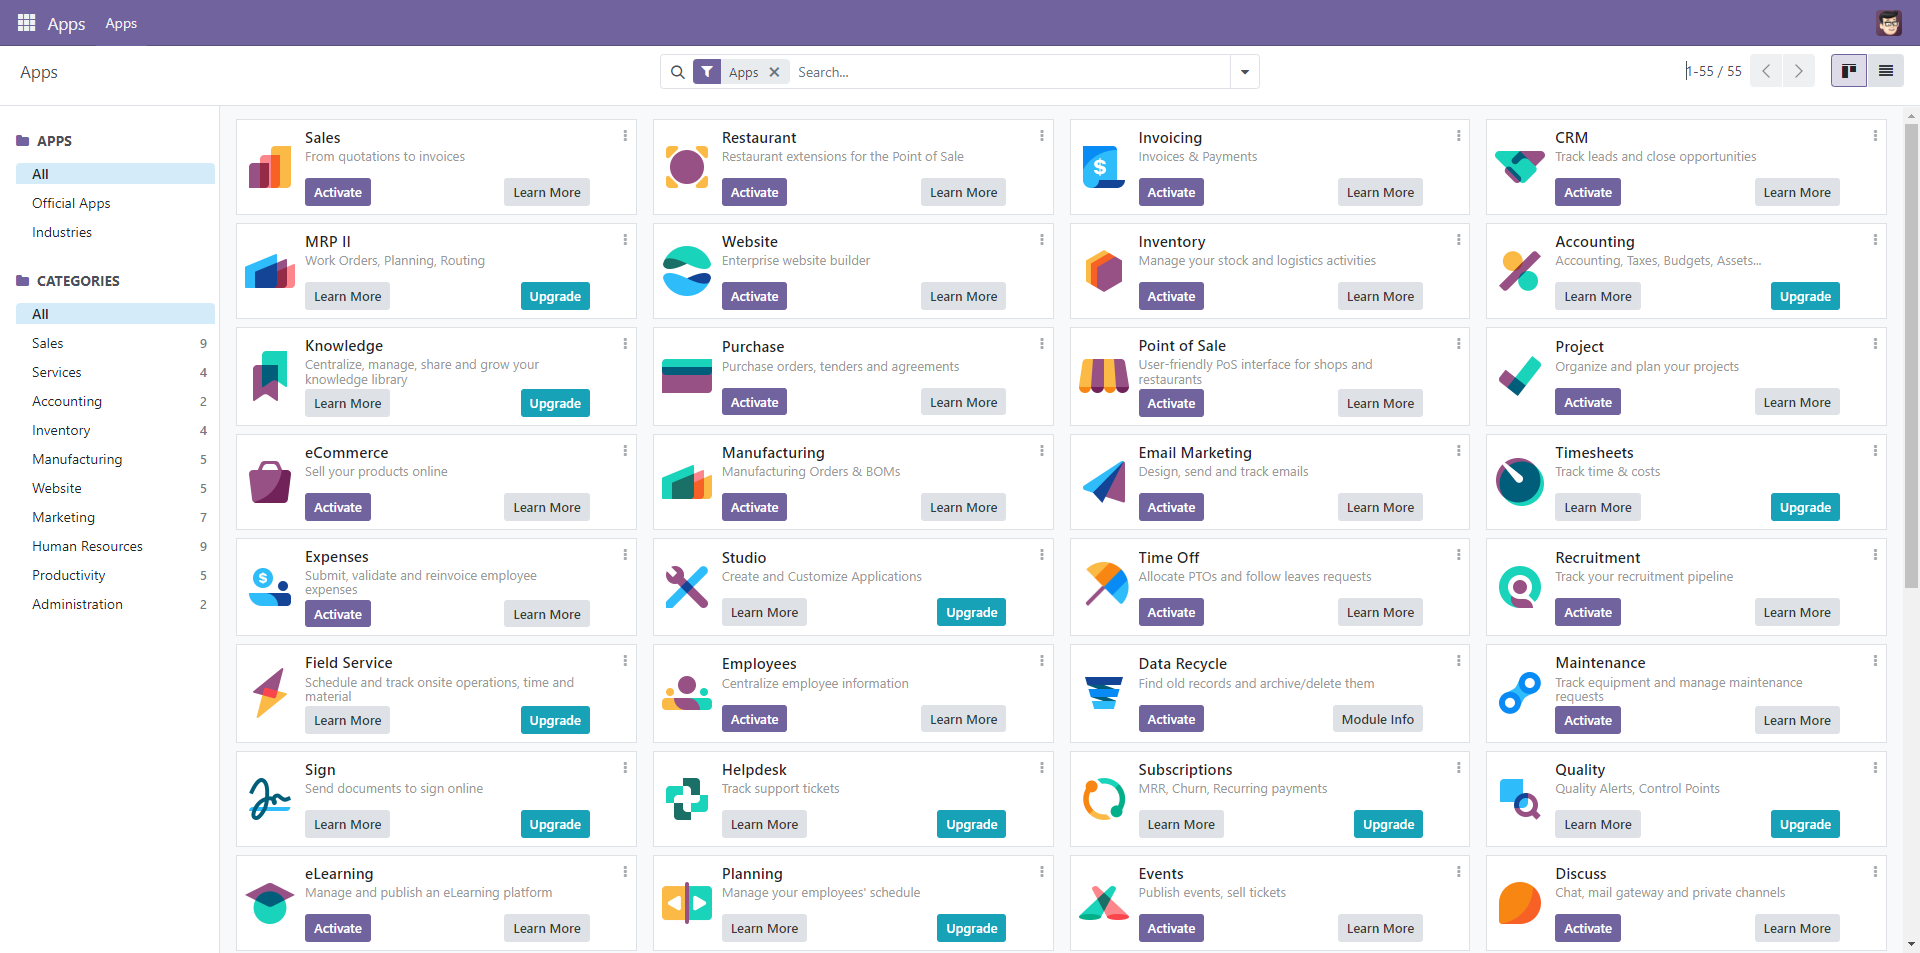
You can start using Odoo to manage your business from here on.
Step 10 - Update Odoo
Stop the Odoo server.
$ sudo systemctl stop odoo-server
Switch to the Odoo system user.
$ sudo su - odoo
Pull the latest source code from GitHub.
$ git fetch
$ git rebase --autostash
The second command may encounter source code conflicts if you manually change the source. You will be given the list of conflicted files. You will need to manually change all the files and rerun the command to fix the issues.
If you want to discard the conflicting changes, you can run the following command to reset the source.
$ git reset --hard
Activate the Python virtual environment.
$ source odoo-env/bin/activate
Install the Python dependencies.
$ pip3 install -r /opt/odoo/odoo/requirements.txt
Exit the Python virtual environment.
$ deactivate
Start the Odoo server.
$ sudo systemctl start odoo-server
Step 11 - Secure Odoo using Fail2Ban
This step is optional but if you have Fail2Ban installed, you can add configuration for Odoo to protect it.
Create and open the odoo-login.conf file for editing.
$ sudo nano /etc/fail2ban/jail.d/odoo-login.conf
Paste the following code in it.
[odoo-login]
enabled = true
port = http,https
bantime = 900  ; 15 min ban
maxretry = 10  ; if 10 attempts
findtime = 60  ; within 1 min  /!\ Should be adjusted with the TZ offset
logpath = /var/log/odoo.log  ;  set the actual odoo log path here
Press Ctrl + X to close the editor and press Y when prompted to save the file.
Create and open the odoo-login.conf filter file for editing.
$ sudo nano /etc/fail2ban/filter.d/odoo-login.conf
Paste the following code in it.
[Definition]
failregex = ^ \d+ INFO \S+ \S+ Login failed for db:\S+ login:\S+ from <HOST>
ignoreregex =
Press Ctrl + X to close the editor and press Y when prompted to save the file.
Restart Fail2Ban.
$ sudo systemctl restart fail2ban
Conclusion
This concludes our tutorial on installing and configuring Odoo on the Rocky Linux 9 server. If you have any questions, post them in the comments below.

